Deploy VMware Webhook Shim Docker Image on Azure Container Instances, then Send vROps Alerts to Slack
There’s been a lot of hype around vROps being able to send REST notifcations since vROps 6.5 rolled out, including some confusing messaging that webhooks make it possible to integrate with chat services right out of the box. However, setting up vROps notifications to Slack is not exactly a walk in the park. Here are the high level requirements:
- Add the Incoming Webhooks app to slack and configure it
- Deploy the VMware Webhook Shims web app and configure that
- Configure the outbound rules in vROps
For step 2, there are different options for deploying the webhook shims app. I took the extremely overcomplicated path of deploying it using the Docker container as an Azure Container Instance. Why? I don’t really know. Do I recommend it? I’m not totally sure if I do or not… but it does work.
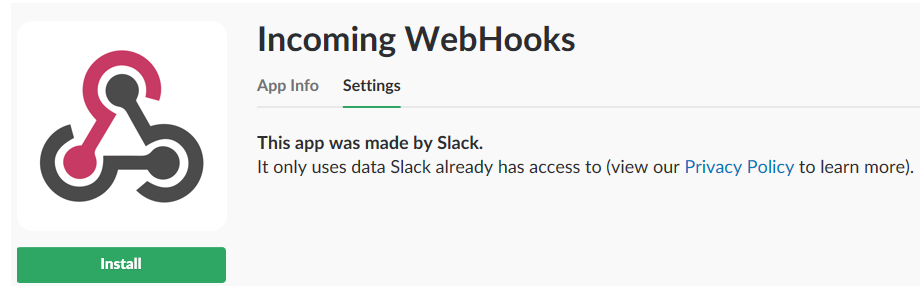
##Add and Configure the Incoming Webhooks app to Slack
This part is pretty easy really. Just go to the Slack app directory, search for “Incoming Webhooks” and push the green “Install” button.
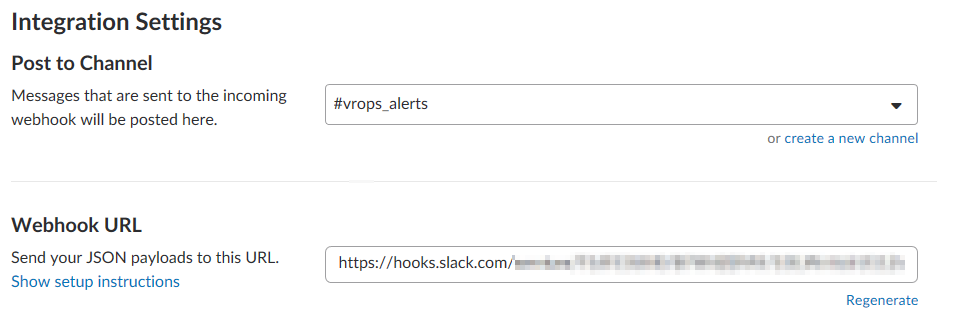
You’ll need to configure the plug in now, and the key parts are where you tell it what channel to post to and the URL it generates. You will need this for the shim later, so it knows where to send alerts.
##Deploy the Webhook Shim
There are 3 documented ways to deploy this documented on the github page: using a Docker container, using Photon OS, or just using a Linux server with python. It is not supported to run it from the Log Insight, vROps or vCenter Server Appliances. Also it might not even be possible, because I tried to do that myself in spite of it being unsupported and failed.
I didn’t have a webserver of my own, so I thought I’d get really crazy and deploy it in THE CLOUD. But knowing that it came as a container, I decided to go super crazy and deploy it directly onto a container service. I ended up choosing Azure because I’ve never used it before and it comes with a $200 credit to try it out. Since we’re just deploying a single, lonely container, the best choice seemed to be the Azure Container Instance service.
A little context here… Once you end up deploying this web app, there are config files that need to be changed in the container. Now in normal docker you would just attach to the container and edit them and be on your way. But Azure Container Instance doesn’t have a way to attach and interact with the container. That means the container needs to be ready to go just as it is, so we will have to jump through some hoops:
- Run the Docker container on your local machine
- Edit the config files
- Save the Docker image
- Create a private repository in Azure using Azure CLI
- Upload the image to Azure
- Deploy the customized container
##Prepare the Docker Container
This part is pretty straightforward if you use Docker at all, and even pretty easy if you never do. I mostly followed this guide for these steps. Fire up docker on your local machine and run docker run -it -p 5001:5001 vmware/webhook-shims. This will download the webhook shim container onto your local machine and start it up interactively, listening on port 5001. You will see the log file from the web service.

This is mostly to prove that it works. You can navigate to your localhost port 5001 to test the page. Hit Ctrl+C to stop the container. Run docker ps -a to see the instance of the container you just ran and get the id. We will need to start it up again and enter the shell so we can edit the config files. For that, run
docker start <container name or id>
docker exec -it <container name or id> /bin/bash
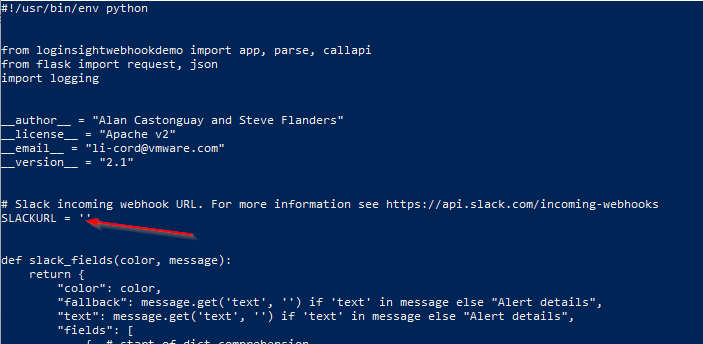
This will take you to the bash shell of the container. Now you need to edit the slack config file, so just hit vi loginsightwebhookdemo/slack.py to load it in vi. You need the webhook URL from the Incoming Webhooks Slack addon from earlier, and you need to paste it between the single quotes at the line starting with SLACKURL = ''
Once you’ve added your slack webhook url, save the file and Ctrl+C to stop the container. You can rename it now, I called mine webhook-shim-jon-v1 which is redundant but by the time I remembered it was redundant I didn’t want to rename it. Anyway, to do that you just enter docker rename <container id or name> newname Now we need to save this container that has our Slack URL in it, so run docker save <container id>. Now if you run docker images you will see the old webhooks-shim container and the new one we just edited.

Now the container is ready!
##Prepare Azure and Deploy the Custom Container
Prerequisite to this step is that you have an Azure account and that you’ve installed Azure CLI. I don’t have anything really original to add to this tutorial which is what I followed from this point forward. We’ve already prepared the container image, so skip to step 2. Azure CLI runs from the command prompt, not PowerShell, so keep that in mind. Here’s the quick and dirty version, mostly for my own record:
- Log in to Azure
az login - Create a Resource Group
az group create --name myResourceGroup --location westus - Create a unique registry. As in, unique to the world. So like ContainerRepoVDude123.
az acr create --resource-group myResourceGroup --name ContainerRepoVDude123 --sku Basic --admin-enabled true - Log in to the container registry you just created
az acr login --name ContainerRepoVDude123 - Get the login server name of your container registry
az acr show --name <acrName> --query loginServer --output table - Tag the Docker container we created with the registry login name (this is a Docker command)
docker tag webhook-shim-jon-v1 <loginservername>/webhook-shim-jon-v1:v1You need to add the:v1which is what I said my name was redundant. - You can run
docker imagesto verify it worked correctly - Push the container to the registry
docker pushwebhook-shim-jon-v1 - You can list the registry images to verify it worked
az acr repository list --name <acrName> --output table - Get the password to your container registry
az acr credential show --name <acrName> --query "passwords[0].value" - DEPLOY THE CONTAINER!
az container create --name webhook-shim-jon-v1 --image webhook-shim-jon-v1 --cpu 1 --memory 1 --registry-password <acrPassword> --ip-address public -g myResourceGroup - Watch for the container state to switch to “Running”
az container show --name webhook-shim-jon-v1 --resource-group myResourceGroup --query state - Get the IP Address
az container show --name webhook-shim-jon-v1 --resource-group myResourceGroup --query ipAddress.ip
Now you’re ready to ROCK AND ROLL! Go to ipaddress:5001 and you should see the endpoint url list! You can also watch the container’s logs by running az container logs --name aci-tutorial-app -g myResourceGroup
##Configure vROps Notifications
Now you need to configure vROps to send to the shim, and from there the shim will send to Slack! Log in to vROps and go to Administration > Management > Outbound Settings. You need to ender something in every field, even though the only thing we really need is the Url. So just put ‘none’ in the User Name, Password, and Certificate fields.
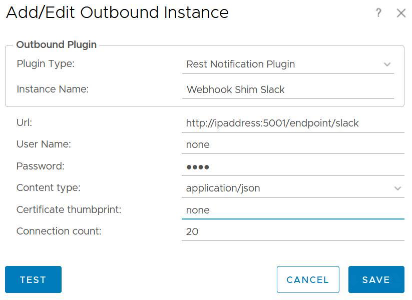
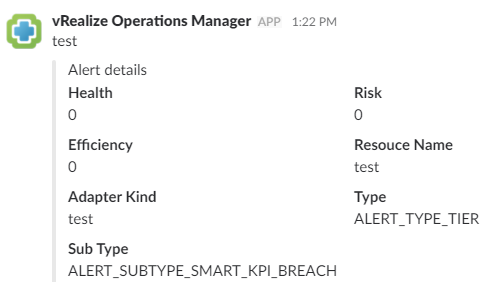
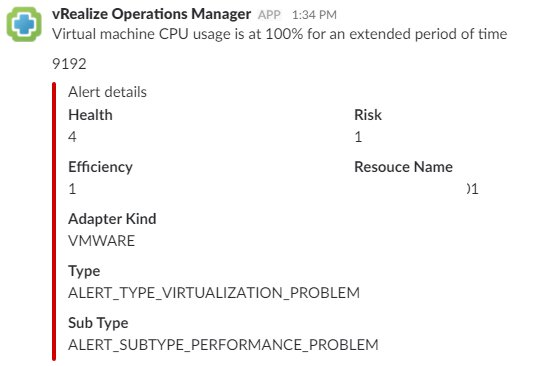
You can click “Test” and it will say it failed, but it is successful. In fact, if everything is set up right that will generate a message in Slack!
Now you need to set up an Alert rule to use the new outbound settings. Go to Alerts > Alert Settings >Notification Settings and click “Add Rule.” You can set this up however you’d like, but keep in mind this will send any alerts to Slack as you define it. So if you want to receive every single alert and cancellation you can, but it’s going to get super noisy. The example below is configured to send all alerts but only when they have the “New” and “Updated” statuses, not “Cancelled.”
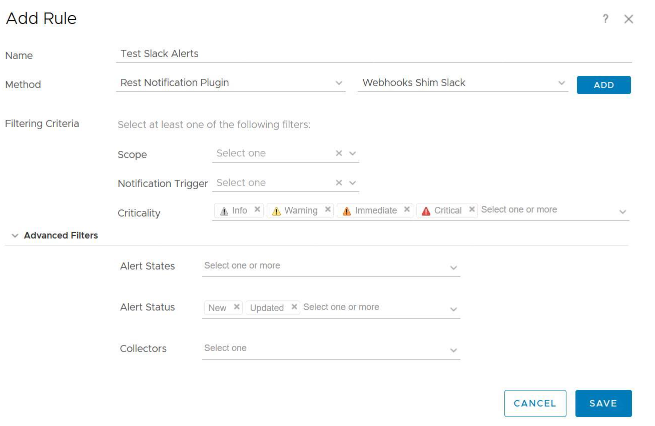
This is just an example, there are a million ways to define this rule. Once you click save, all the alerts that match your rule should now end up in Slack! They’re even color coded!
And that’s how you get the VMware Webhook Shims container running as a Azure Container Instance and configure vROps to send alerts to Slack! Imagine the possibilities!